PCB board stuffing, also known as PCB assembly, is a crucial process in electronics manufacturing. It involves placing and soldering electronic components onto a printed circuit board (PCB) to create a functional electronic device. This process requires precision, expertise, and specialized equipment to ensure the components are placed accurately and securely onto the PCB.
The PCB board stuffing process can be done manually or through automated machinery. Manual assembly involves a technician placing each component onto the board by hand and then soldering it in place. This process is time-consuming and can be prone to errors, but it is still used for low volume production runs or for prototypes. Automated assembly, on the other hand, uses pick and place machines to accurately place components onto the board. This method is faster and more accurate than manual assembly, making it ideal for high volume production runs.
What is PCB Board Stuffing?
PCB board stuffing, also known as PCB assembly or PCB population, is the process of placing and soldering electronic components onto a printed circuit board. This process is essential in the manufacturing of electronic devices, as the PCB board serves as the foundation for the electronic components to function properly.
The PCB board stuffing process involves the use of automated machines or manual labor to place the components onto the board, followed by a soldering process that secures the components in place. The components can range in size and complexity, from small resistors and capacitors to larger microprocessors and connectors.
The PCB board stuffing process requires careful attention to detail, as any errors or defects in the placement or soldering of components can lead to malfunctioning devices. Quality control measures are often implemented to ensure that the PCB board is properly stuffed and functioning as intended.
Overall, PCB board stuffing is a crucial step in the manufacturing of electronic devices, and requires skilled technicians and advanced equipment to ensure the highest level of quality and reliability.
Types of PCB Board Stuffing
When it comes to PCB board stuffing, there are two main types: through-hole stuffing and surface mount stuffing.
Through-Hole Stuffing
Through-hole stuffing involves drilling holes in the PCB and inserting components through the holes. The components are then soldered onto the opposite side of the board. This method is often used for larger components that require a stronger mechanical connection, such as transformers and connectors.
Through-hole stuffing can be time-consuming and requires more space on the board compared to surface mount stuffing. However, it can provide a more reliable connection and is easier to repair or replace components.
Surface Mount Stuffing
Surface mount stuffing involves attaching components directly onto the surface of the PCB. This method is often used for smaller components, such as resistors and capacitors.
Surface mount stuffing allows for smaller and more compact PCB designs, as well as faster assembly times. However, it can be more challenging to solder and may require specialized equipment.
In addition to through-hole and surface mount stuffing, there are also hybrid methods that combine both techniques. These hybrid methods can provide the benefits of both through-hole and surface mount stuffing, but may also have their own unique challenges.
Overall, the choice between through-hole and surface mount stuffing depends on the specific requirements of the PCB design and the components being used.
Tools and Equipment for PCB Board Stuffing
When it comes to PCB board stuffing, having the right tools and equipment is essential. Here are some of the most important items you’ll need:
Soldering Iron
A soldering iron is a tool that heats up to melt solder, which is used to join components to a PCB board. There are many different types of soldering irons available, ranging from basic models to more advanced ones with adjustable temperature settings. It’s important to choose a soldering iron that is appropriate for the job at hand, as using the wrong tool can lead to poor quality connections or even damage to the board.
Soldering Station
A soldering station is a more advanced version of a soldering iron, with additional features such as adjustable temperature settings, digital displays, and more precise control over the amount of heat applied. Soldering stations are ideal for more complex jobs and for those who need to work on a variety of different components.
Flux
Flux is a chemical compound that is used to clean and prepare the surfaces of components and PCB boards before soldering. It helps to remove any oxidation or other contaminants that can interfere with the soldering process, and can also help to improve the flow of solder.
Solder Wire
Solder wire is the material that is melted and used to join components to the PCB board. There are many different types of solder wire available, with different compositions and diameters. It’s important to choose the right type of solder wire for the job at hand, as using the wrong type can lead to poor quality connections or even damage to the board.
Solder Sucker
A solder sucker is a tool that is used to remove excess solder from a PCB board. It works by creating a vacuum that sucks the excess solder away from the board, making it easier to clean up and prepare for the next stage of the process.
Tweezers
Tweezers are an essential tool for handling small components during the PCB board stuffing process. They allow you to pick up and place components with precision and accuracy, making it easier to achieve high-quality connections.
In summary, having the right tools and equipment is essential for successful PCB board stuffing. From soldering irons and stations to flux, solder wire, solder suckers, and tweezers, each tool plays an important role in the process. By choosing the right tools and using them correctly, you can ensure that your PCB boards are of the highest quality and will perform reliably for years to come.
Steps for PCB Board Stuffing
Preparing the PCB Board
Before starting the PCB board stuffing process, it is essential to prepare the board. The following are the steps to prepare the board:
- Clean the board with isopropyl alcohol to remove any dust, dirt, or oil.
- Apply a layer of flux to the board to help with soldering.
- Identify the components to be placed on the board and ensure they are available.
Placing Components on the Board
Once the board is ready, the next step is to place the components on the board. Here are the steps to follow:
- Identify the placement of each component on the board by referring to the circuit diagram.
- Place the components on the board in the correct orientation and position.
- Use a magnifying glass to ensure the components are placed correctly and aligned with the pads.
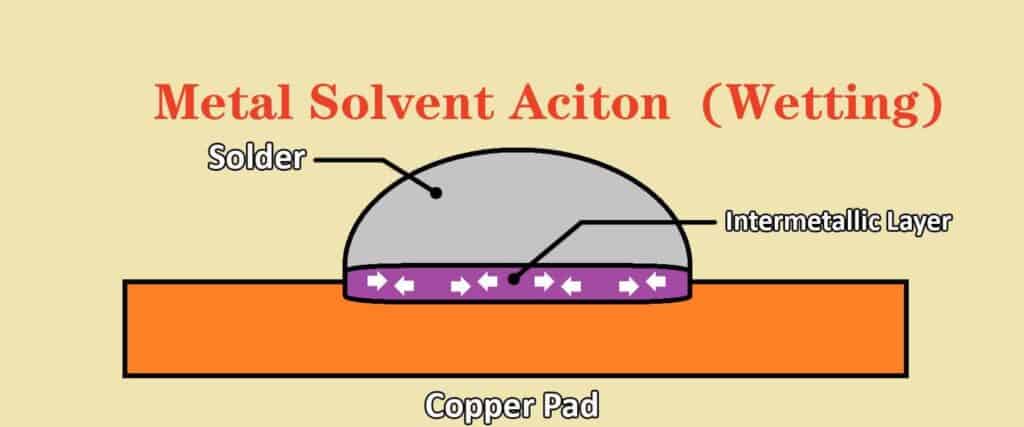
Soldering the Components
After placing the components on the board, the next step is to solder them. Here are the steps to follow:
- Apply a small amount of solder to the tip of the soldering iron.
- Place the tip of the soldering iron on the pad and component lead simultaneously.
- Allow the solder to melt and flow evenly around the pad and component lead.
- Remove the soldering iron and wait for the solder to cool and solidify.
Repeat the above steps for all the components on the board, ensuring that the soldering is neat and clean.
In conclusion, the PCB board stuffing process involves preparing the board, placing the components on the board, and soldering the components. By following these steps, you can ensure that your PCB board is correctly assembled and functional.
Tips for Successful PCB Board Stuffing
Check the Polarity of the Components
Before starting the PCB board stuffing process, it is important to check the polarity of the components. This step is crucial to ensure that the components are inserted in the correct orientation. If a component is inserted in the wrong orientation, it may not function properly or could even be damaged.
To check the polarity, refer to the component datasheet or markings on the component itself. Make sure to double-check the orientation before soldering the component onto the board.
Clean the Board After Stuffing
After the components have been inserted and soldered onto the board, it is important to clean the board thoroughly. Any leftover flux or debris can cause problems with the board’s functionality or even damage the components.
Use a flux remover or isopropyl alcohol to clean the board. Make sure to use a lint-free cloth or swab to avoid leaving behind any fibers or debris.
Use the Right Amount of Solder
Using the right amount of solder is essential for successful PCB board stuffing. Too much solder can cause short circuits, while too little can lead to a weak joint that may fail over time.
Refer to the soldering guidelines provided by the component manufacturer. Use a soldering iron with the appropriate temperature and wattage for the components being used. Make sure to apply the solder evenly and avoid overheating the components.
In conclusion, following these tips can help ensure a successful PCB board stuffing process. Double-checking the polarity of the components, cleaning the board after stuffing, and using the right amount of solder are all important steps for a functional and reliable PCB board.
Comments are closed