Are you a beginner who aims to become a pro when it comes to soldering PCB boards? Soldering a PCB board has some tips that make it easier to solder your circuit board.
In this article, you shall get to know actionable soldering tips experts use when it comes to PCB boards. Also, as you progress with reading this expository guide, there are 15 soldering tips for PCB boards we shall discuss. Let us dive into the world of PCB!
————————————————————-
Request PCB Manufacturing & Assembly Quote, Pls Send PCB File to Sales@raypcb.com Now
————————————————————-
What Does it Mean to Solder PCB Boards?
In this part of the article, we shall focus on what it means to solder your circuit board.
Meanwhile, we have two groups when it comes to the soldering board. The types include the board which extracts heat from the metal while the other simply reverses heat into the metal. However, the soldering board that reverses heat is mostly elastic, fragile, and soft. Plus, it is very effective for welding pieces ranging from medium to huge or wide ones. For instance, these pieces include sculptural pieces, bezels, and hollow rings for construction.
Accordingly, it is the underside of PCB that doesn’t have components. Also, during assembly, it is this undersurface that brushes against the welding wave. In addition to this, one could also refer to the undersurface as the solder surface or side. Yet, there is always overcrowding or jamming at both sides of the PCB board. Nevertheless, during the assembly procedure, there is no need for wave soldering.
Soldering PCB has to do with the procedure of soldering or welding electronic circuitry boards. There is no electronic gadget that does not involve soldering. So, any beginner who aims to learn soldering PCB boards must know that it requires interest. In fact, this procedure is vital to assembly any electronic circuitries.
Meanwhile, there are broad methods one can use during soldering. The soldering process requires the combination of two small parts on the exterior of your PCB board. However, this process involves clarity on how best to combine these small pieces together.
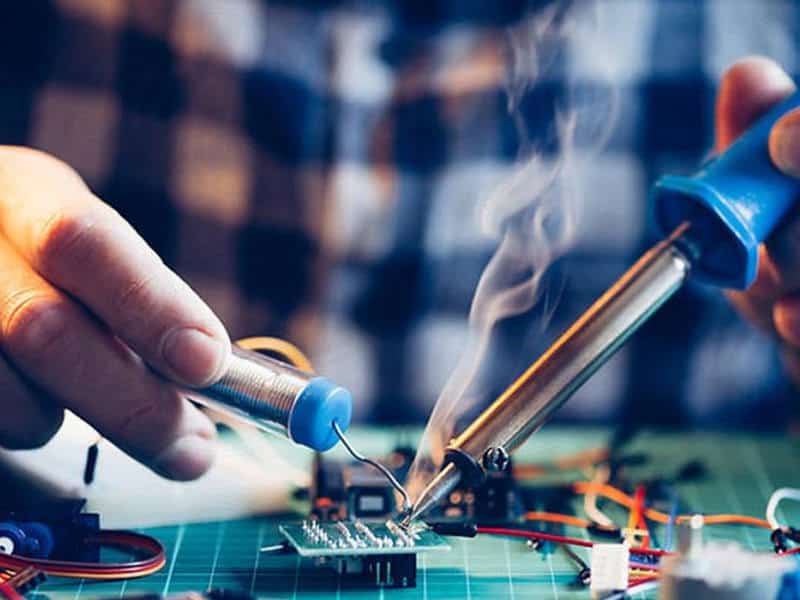
Soldering PCB board is a procedure involving interfacing partially two different electronic pieces on the circuit board. During the soldering process, the midpoint is concentrating on the basics. This involves getting to know every component part of the soldering procedure. Therefore, what you need for the simplest soldering process is your soldering iron with an amount of solders alongside the pieces you intend to jointly solder.
Nonetheless, the solder iron appears slightly like what you could call a pen. Plus, this solder iron can be uncommonly hot. It melts the patch while using it to compress the two parts. Although there are varying types of solders, it is commonly some metal fusion of either tin or lead combined with brass and alternatively silver. It is with the intention to retain a little liquidation point. While your solder iron dissolves the metal, it later uses it to a degree just like glue to stick to separate. Also, while your solder metal gets moderately cold, it then becomes thick or solid to form an extensive shape which joins the two parts.
————————————————————-
Request PCB Manufacturing & Assembly Quote, Pls Send PCB File to Sales@raypcb.com Now
————————————————————-
What Does Hard Soldering PCB Board Mean?
There are basically two diverse processes to solder your PCB board. One is for the hard soldering which we shall discuss shortly.
So, the hard soldering process of the PCB board involves using some inflexible solder to jointly fuse two separate metal elements. It requires transmission across openings of pieces that turn out to be opened while mounted to increased temperature. This process of hard soldering PCB boards consists of two smaller forms. Additionally, one can refer to the forms as brazing and silver soldering. This implies that the silver soldering utilizes some silver amalgam which is mostly cadmium silver. This silver is for metal lining. Furthermore, one uses this design to produce small parts. Also, it fills some certain sorts of upholding on the PCB.
One uses the silver for this process because it gives some discharge running rarity. Although, it is not usually an excellent choice for lining alone. While this is the aim for an extra fuse which normally one uses to create reliable silver soldering.
Wherefore, brazing soldering is a design for joining two ends produced from base metals. This uses some liquefied filler metal.Then, the result is a firm joint which fuses the two diverse ends. Typically, one uses brass for filler during brazing.
What Does Soft Soldering PCB Board Mean?
This is a process one uses for adjoining small pieces toward bigger circuit boards. However, the small pieces retain a low compressing temperature that begins to cut off beneath high temperatures involving cool sources. Rather than fluxing the pieces, one uses more advance to affix the pieces to the PCB. The extra procession is the filler metal. This is usually some tin-lead compound. One vital element of the compound is how its melting temperature should be above 752°F.
During the process of soft soldering, using this compound is crucial. This is because it is about some coupling maven connecting the pieces with the circuit board. You use gas light to produce the necessary warmth during this process. Thus, it separates the compound while fusing the pieces to the PCB board.
What are the 15 Soldering Tips for PCB Board?
Earlier, we discussed what soldering a PCB board means and the two diverse processes or procedures to soldering the circuit board.
Now, let us dive into the soldering tips for the circuit board. These are actionable tips any beginner can follow. If you study them thoroughly, then you can also become a pro at soldering PCB boards. Below are the 15 soldering tips for PCB boards.
In a nutshell, you shall learn ways to effectively utilize your solder, soldering iron, grabbing arms, with other tools. Soldering tips are guidelines to follow when fastening metals together. This implies that you follow the tips when soldering resistors with other components to your PCB Board.
Pick the Right Solder
This is the first step for any beginner. The soldering tips begin with you choosing the proper tool like your solder. Although, we have varying kinds of solder.
The types include lead-free and based solder. The lead-free solder melting point is higher than lead solder whose melting point is lower. Despite that, the lead solder has some lead which could have a harmful impact on one’s life. The lead is carcinogen. On the other hand, it is not necessarily simple to move the lead-free solder. Therefore, choose the right diameter of solder when soldering your circuit board. It all begins with this step.
————————————————————-
Request PCB Manufacturing & Assembly Quote, Pls Send PCB File to Sales@raypcb.com Now
————————————————————-
Assemble Your Supplies
One of the soldering tips you must not ignore is this. After you choose the right diameter of solder for your task, assemble all supplies you need. It is very vital you assemble these supplies from dependable sources. These are tools you use while soldering your PCB board.
These are components you weld onto the PCB board. So, each of these components are useful. You cannot begin soldering without having the amalgam and pieces to fasten together to the circuit board. The right supplies definitely make it easier to work. If one of these supplies gets missing, then you can’t have a smooth procedure for soldering your board.
Build Up
This is the next step after you gather your supplies. This tip requires that you begin to pick the proper soldering iron. Meanwhile, you have to pick the size tip for the iron. Each soldering type requires a different size tip. It all depends on if you are working on a soft or hard soldering PCB board. Then, you can heat up the soldering iron. Also, you wet the sponge and clamp your PCB.
When you clamp your components down, it prevents the circuit board from moving around. Afterwards, you can turn on your filter fan. You can then build up the helping hands, there are few consisting of magnifying glass.
Set Up Your Fan Rightly
This is one of the 15 soldering tips for PCB boards you need to get right. The carbon filter fan needs the right set up. You can erect your filter fan near the helping hand. The carbon filter fan has some functions which it performs during the soldering process. Smoke evaporates into the air when soldering. The filter fan helps draw in smoke during soldering.
This fan helps fresh air or smoke circulate through. Your carbon filter fan needs to be close to your helping hand. If otherwise, there will be spores, emissions, and odor while you solder your components onto the PCB.
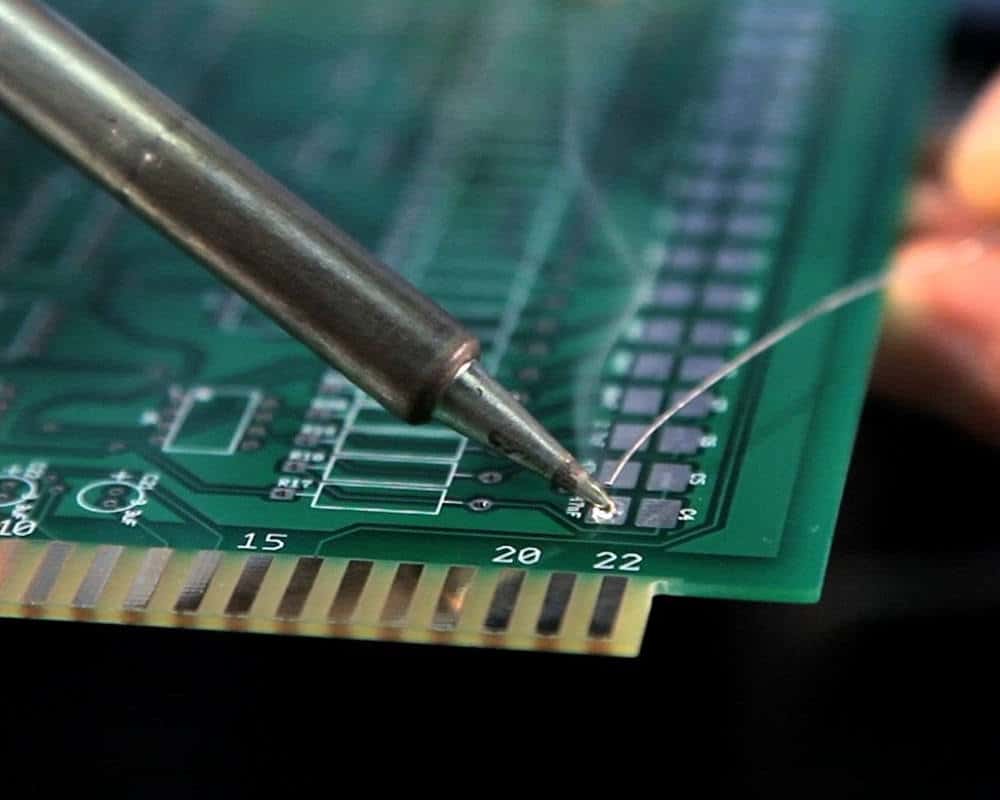
Put the Components Onto the PCB Board
These soldering tips require you to follow them thoroughly. This helps to prevent any mistake in the course of soldering objects onto the PCB. Plus, you need to be calm when inserting the components onto the PCB. When you insert these objects, ensure that each perfectly fits its slot available in the PCB. You have to read widely on how each component works and how it individually fits into each of the slots.
Please, pay attention to details. You need to follow instructions thoroughly. In addition to this, we have two sides appearing on the PCB. This implies that you don’t put all components on one side.
The First Option for Soldering
The soldering tips also have soldering options. You can follow two procedures or methods when applying your solder. One can hold one’s solder in the right-and-left hand while giving the solder close to one inch and divided by two. Then, lightly press your solder to its metal prong.
You can hold your iron in the dominant hand while pressing it to your solder along with your metal prong. You need to be fast with this so as to stop a chunk of solder from forming. Therefore, to prevent that, ensure that your components are at the proper place before soldering.
The Right Amount of Solder
Your soldering procedure needs full attention from you. You can have a perfect design if you put in the right work. The right work also requires you to get the right amount of solder. While soldering, your application of solder should be in the right quantity.
Plus, your device works when you apply the right amount of solder. The fusion between your metal prong and pad can only work when there is enough solder. With small solder, there can never be any connection between our metal prong and pad. Following the soldering tips means you get the right amount of solder.
The Second Soldering Option
One of the soldering tips is to follow the second method of soldering. This is the application of solder to your soldering iron. It is the first thing you do. You grab your solder in the non-dominant hand while your soldering iron is in the dominant hand. You have to immediately brush your soldering iron with the solder.
Thereby, it eventually creates a little chunk of liquefied solder on your soldering iron. Then, you rub your soldering iron against your prong. This way, it comes off. In addition, do it against surfaces you really don’t mind having solder on. Eventually, this falls off your iron.
————————————————————-
Request PCB Manufacturing & Assembly Quote, Pls Send PCB File to Sales@raypcb.com Now
————————————————————-
Use the Sponge
Along the line, you may experience some challenges. This is due to some mess that may come up. It is as a result of having dissipated solder on your iron. When one has extra solder on his iron, all that matters is removing it with a wet sponge. This is when you have to use the damp sponge.
Having excess solder is as a result of applying too much on your soldering iron. Then, you must always have your wet sponge around your set up. One drags the tip of the soldering iron with the sponge in an attempt to remove the excess solder. It makes your soldering nice.
How to Tidy up Soiled Prongs and Solder
Sometimes, you can’t control how messy your soldering gets. There are many soldering tips on how best to tidy up soiled solder. Once again, a chunk of solder can make the solder become messy. So, it requires you to clean the solder up. If one misses the right way of placing his solder, it also becomes soiled.
In case you have two pins near the solder, try to pull your soldering iron round its center so that its fusion could split. But if this doesn’t work, use your solder wick. Ensure you clip any prongs sticking out from your PCB.
How to Use Your Solder Sucker
One of the soldering tips to follow is to learn how to use your solder wick or solder sucker. Also, one removes soiled solder by using the solder sucker. Again, one can use it to tidy up excess solder. Sometimes, your PCB may become messy during soldering.
It may be due to placing any object using the wrong step into your board. Nonetheless, the sucker works for all these. Simply heat your solder you intend to remove using the soldering iron and drag your black syringe on the sucker. Then, ensure the sucker is near the removing solder to shove your button to alert your vacuum.
Secure Your Soldering
It is paramount you know that it goes beyond you just setting up. You need preparation before soldering your circuit board. One way to ensure your soldering goes smoothly is to secure it. How do you secure it? You simply do this by utilizing your helping hand.
The helping hand helps to keep your task safe. Your hand may shake while you use your sucker. This results from you hitting those objects you’re soldering. When you secure your PCB board while working, it cannot lose from your helping hand. Thus, if otherwise, your board may loose causing it to break.
How to Use the Solder Wick
Also, soldering tips involve you learning how to use the solder wick accurately. Earlier, we mentioned how to use the solder sucker. Both the wick and sucker help remove solder you don’t want.
One way to utilize the solder wick is to heat your solder. In addition to that, you push it across your solder. Then, the dissolved solder affixes the whole to your solder wick. You can then rub down your wick with your soldering iron. This way, it becomes so simple to use. The solder wick is not a difficult method you can use when removing solder. Nonetheless, it requires you to stick to the guide on how to use it in such a simple way.
Check Out Your Solder
This is one of the soldering tips you must stick to. You need to be on the lookout regularly for the solder. Don’t just keep soldering without checking it constantly. This helps to detect any error easily.
So, if the soldering isn’t working right, you need to ensure that none of the solder presses against each other. When they touch each other, it results in a short circuit. Still, check out the solder. On account of this, ensure you have sufficient solder on each of the prongs. Else, it won’t affix to your PCB.
Tidy Up
Above all, following soldering tips saves you stress. You can have smooth soldering of your PCB board if you clean up all you need to. Having said that, cleaning up messy solder makes your work perfect and presentable.
Some engineers ignore the glob of solder that appears on the circuit board. One actionable tip that works at all times is to tidy up your circuit board regularly. The environment where you work has to be clean, too. Also, put away anything that hinders your soldering from coming out well. Never leave the iron on. It is not safe.
————————————————————-
Request PCB Manufacturing & Assembly Quote, Pls Send PCB File to Sales@raypcb.com Now
————————————————————-
What Tools Do You Need For Soldering Your Circuit Board?
The soldering tips aren’t complete without you getting the right tools or equipment for soldering. Your PCB design won’t work without the necessary tools. Also, you may have a short circuit without the right tools. Plus, the following are the basic tools you need for any kind of soldering you are doing.
PCB
As a beginner, the Printed Circuit Board is one tool you need. Concurrently, you need this as a result of your electrical design. The procedure for soldering takes place on the PCB. Thus, you use the patching tools to fasten diverse pieces with terminals interfacing on the board. All soldering design requires you to get this board.
Solder Flux
Also, the flux is one tool you need. This is for refining and it is for three unique needs while soldering. The flux cleans each part one is soldering. Also, it evaporates air coming into your material and prevents any rust.
Soldering Paste
One needs the soldering Paste to fasten the diverse leads of the PCB. It is important for your soldering.
Soldering Iron
The soldering iron is a must have for any engineer working on soldering. It helps provide warmth that softens your solder. Yet, the iron looks like a pen. It could be so small but has a distinct function in soldering works. Although, it comes in different shapes and sizes.
Other tools you may need are wire cutters, grabbing arms, solder wick, carbon filter fan, sponge, and solder sucker.
The soldering tips always complement the soldering tools. This is because when you have the right tools, it makes it easier to follow soldering tips.
Soldering tips are numerous. So, you should always ensure that you read more about new tips.
Soldering Tips That Flatter Tip Endurance
- Don’t overfill a wipe if you are using it during soldering.
- Also, always turn off your soldering iron when you aren’t working.
- Meanwhile, your tip doesn’t need pincers for you to expel it.
- Make sure you tin your tip using solder regularly.
Conclusion
We discussed actionable soldering tips that every beginner must know. All these 15 soldering tips for PCB boards make it easier to solder without stress.
Note that you can use your solder wick to clean up mess during soldering. Also, temperature regulation is important when you are working. Plus, you need to secure your soldering during your task. We hope that you find these tips useful for you.
Comments are closed